Wednesday, March 31, 2021

The Card Concept: Bunny Hugs

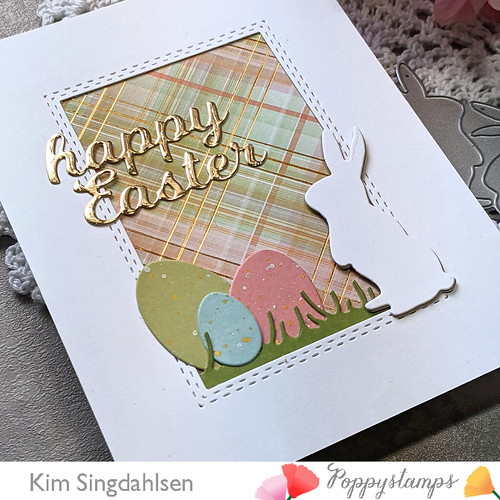
 It's time for a new challenge at The Card Concept.  It's called Celebrate Easter and is a charming display of rabbits, carrots and storage jars!

I was obviously inspired by the bunnies and carrots but also by the tall lettering and the container shapes on my Clean and Layered card.  I love how it all came together!

3.31.21 CC

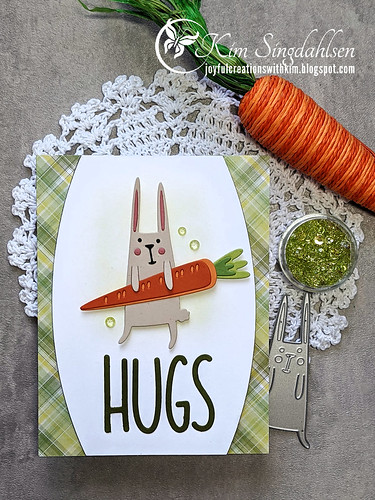
I was very excited about this one because it gave me an excuse to buy a die set that I had my eye on.  I thought it would be perfect for my son's cards for Easter. They are 21 and 25 so not cutesy but not serious.  I had talked myself out of it partly because I have other choices already in my stash and I wasn't even sure I'd send cards.  My youngest son complains that he has to walk all the way across campus to get my cards (realize he's at a smaller school of only 2,500 students so not a big campus) and it seems to always be blizzarding or pouring rain (he's probably right there - it's on the border of Iowa and Illinois near the Mississippi River and it can get insanely cold).  It's not worth sending him a card unless there are gift cards or other goodies tucked into it.  My oldest is busy trying to figure out how to finally graduate and what to do next in life.  My cards don't get much of a reaction - but this one's going to him.  He really needs hugs!

3.31.21 CC side

I hope to see you playing along with us this week at The Card Concept!

SUPPLY LIST

Dies: Sizzix/Tim Holtz Carrot Bunny, Simon Says Stamp Curved Edge, Concord & 9th Tall Type Alphabet

Paper: Memory Box Madras Plaid Coral and Green, Taylored Expressions cardstock: Candy Corn, Sweet Potato Pie, Granny Smith, Peapod, Sweet Basil and Raspberry Sorbet, Bazzill Natural Stone

Ink: Taylored Expressions Granny Smith (in the background)

Freshly Made Sketches: Alleluia

It's time for a new sketch at Freshly Made Sketches! Today we have a sketch by me and here’s what I did with it!

03.31.21 FMS


I have to admit - the idea for the card was in my head when I drew the sketch! Not all of the details, but the idea of a larger flower wrapping around a sentiment panel.  I have a number of these gorgeous stamp/stencil combinations and I am in love with them.  It's such an easy and forgiving way to add color.  You don't get multiple layers in and have a stamp mess things up (or user error) and leave patches unstamped.  You can just keep brushing color until you are happy.  

I needed one more Easter card so I went with a fresh pink color scheme.  Then I decided the bold "alleluia" was just right but didn't fit entirely in the small rectangle in the sketch.  So I let the rectangle go under the flower (because then you'd never know the sentiment didn't fit!)

When I decided to use a frame instead of a solid rectangle, I was a bit stuck on my vertical stripe.  But I recently got this polka dot tulle ribbon and decided it would be a nice accent through the frame without being distracting.

03.31.21 FMS Side

I am so excited to see what you create with this sketch.  The design team's and our player's creativity never ceases to amaze me.  I am in awe of all of the unique and absolutely amazing creations.  Have fun!

SUPPLY LIST
Stamps: Pinkfresh Choose Hope - including the die and the Layering Stencil
Dies: Simon Says Stamp Frames, Alleluia Word & Shadow
Cardstock: Taylored Expressions Guava
Ink: In layering order - Taylored Expressions Pink Champagne, Stampin' Up Flirty Flamingo, Taylored Expressions Guava. Stampin' Up Pear Pizzaza, Old Olive
Other: Studio Katia Peridot Crystals, Stampin' Up Polka Dot Tulle Ribbon

Monday, March 29, 2021

Just Add Ink: Easter Wreath

I didn't want to miss the current challenge at Just Add Ink. The image is the prettiest Easter wreath I've seen and with Stampin' Up's Wreath Builder dies retiring - how could I not play along? Clearly I wasn't just "inspired" - I pretty much duplicated that wreath!!

3.29.21 JAI side

I cut a rainbow of eggs.  Then because I liked the texture of the eggs in the inspiration photo, I used the Tasteful Textiles embossing folder on them.  I started with one of the the wreaths from the die set, but I also cut a second wreath and clipped a number of the leaves to fill it in.

I didn't use a pink background but I'm wishing I would have. It added a nice warmth to the wreath in the photo. I did add some woodgrain to the white and at least edged it with some pink cardstock.

03.29.21 JAI

The pearls were to add some elegance.  They are older Stampin' Up and I've colored them with Copics to match the cardstock they are on.

Thanks to Just Add Ink for the inspiration!!

SUPPLY LIST

Stamps: Stampin' Up Arrange a Wreath (just the sentiment)

Dies: Stampin' Up Wreath Builder dies, Stitched Labels

Cardstock: Stampin' Up So Saffron, Daffodil Delight, Apricot Appeal, Seaside Spray, Marina Mist, Blushing Bride, Purple Posy, Highland Heather, Gorgeous Grape and Rich Razzleberry. Wreath in Just Jade.

Ink: Just Jade

Other: Stampin' Up Tasteful Textile and Pinewood Planks embossing folders

Thursday, March 25, 2021

Poppystamps: A Butterfly Hello

I am on the Poppystamps blog today with this clean & simple card made extra special with the beautiful background, the fun font of the sentiment and the detail on those butterflies!

03.23.21 PS

I love background dies that give detail but still look clean and simple.  These Pinpoint Half Rings can work for so many types of cards - they could be fun (think fish), sweet (think rainbows), or elegant as it is a classic design.

I was inspired by the "cardmaker's postage stamps". (Did you know there's a US postage stamp specifically for square or for lumpy, bumpy cards!)  The first one included a butterfly and now there's a new one with a different butterfly. So I pulled out the Postage Square die and sponged a little bit of blue in the center so the butterfly popped!

03.25.21 PS side

Check out the Poppystamps for more pictures and more details.

SUPPLY LIST

Dies: Poppystamps Pinpoint Half Ring Plate, Intricate Cut Butterflies and Hello Poe Script, Memory Box (Open Studio) Postage Square Layers

Paper: Memory Box Sunny Orange Collection

Wednesday, March 24, 2021

Freshly Made Sketches: Oval of Flowers

It's time for a new sketch at Freshly Made Sketches! Today we have a sketch by Jen Timko and here’s what I did with it!
 
03.24.21 FMS


Easter snuck up on me this year so I definitely knew I would go in that direction. I took a few left turns on this card. I started out with three crosses silhouetted at the base and the stripes that are on my current card (minus the green) was the sunrise behind it.  The card had amazing potential but #1 I ripped the silhouette I had already die cut and #2 the cross die has totally disappeared. I went through everything in my trash can - no die.  It's possible the cat walked away with it.  It's also possible it got tucked in between other things I had out and years from now I'll pull something out and there it will be! But for today, I had to switch directions.

I have this oval of flowers that seemed very much like an egg.  I added the green strip and the grass and a scalloped frame - and I think I like it better than where I started!!

03.24.21 FMS Side

I hope to see you playing along with us at Freshly Made Sketches!

SUPPLY LIST

Stamps: Memory Box Springtime Typewriter Sentiments

Dies: Simon Says Stamp Oval of Flowers, Frames

Cardstock: Stampin' Up Coastal Cabana, Daffodil Delight, Mango Melody, Flirty Flamingo, Granny Apple Green, Papertrey Ink Aqua Mist, Taylored Expressions Cupcake

Other: Stampin' Up Polka Dot Tulle Ribbon, Studio Katia Gold Foil Pearls

Sunday, March 21, 2021

CAS Colours & Sketches: He is Risen

 The colors at CAS Colours & Sketches inspired me to give another new-to-stencil set a try - the Simon Says Stamp Layered Tulips.  I don't know why it took me so long to jump on the stencil trend, but as soon as they started coming up with fabulous layered stencils, I'm totally on board! It is such an easy way to add color - and to add it with shadows and dimension.

03.21.21 CAS Colours

The first stencil is Saffron with a bit of Mango sponged at the base of each flower, then I stenciled the detail layer in Mango.  All of the bottom layers are Pear Pizzazz but I did a light layer of ink, a medium layer and the darkest layer on the stems.

I hadn't thought ahead past the flowers so I checked my stash and found some new sentiments from Taylored Expressions.  The big sentiment is Handlettered Easter which isn't new - but the dies are!!  I adore the look of cut out sentiments.  The strips are a new addition to the fabulous Simple Strips line - it's Easter Blessings.  The picture shows just a handful of the various sentiments that you can cut out all at once!

03.21.21 CAS Colours side

Thank you to CAS Colours and Sketches for the inspiration!

SUPPLY LIST

Stamps: Taylored Expressions Handlettered Easter and Simple Strips Easter Blessings

Dies: Taylored Expressions Handlettered Easter dies, Simple Strips die

Ink: Stampin' Up So Saffron, Pear Pizzazz, Mango Melody

Paper: Stampin' Up Pear Pizzazz CS and the old So Saffron dsp

Stencils: Simon Says Stamp Layered Tulips

Other: Fun Stamps Journey Black Licorice Silk (for the splatters)

Friday, March 19, 2021

Slimline Embossing: Happy Birthday

I have seen other cardmakers do fabulous things with regular sized embossing folders on slimline cards. I've even seen them line them up and manage to cleanly cover the entire front of the slimline.  For me - it's always an epic failure.  I can't line things up straight and then there's the fact that the edges of the folder squish the already embossing portions making them look flatter.  I have no idea how others are doing it.

So imagine my excitement when I saw someone come out with a slimline embossing folder.  There have probably been others but it's the first that I've seen - Spellbinders Slimline Flora.

03.19.21 Slimline Happy

This is for a workmate's birthday today. I don't know her well so while we were both in the office on Wednesday and we were discussing budgeting, I was covertly studying her office.  None of us accounting types have many decorations - just bland, square offices maybe with a few personal photos - but she did have a cover on the back of her chair.  It was Southwestern but in subtle colors.  So I stood there discussing budgets but my mind was ticking through the colors....terracotta, saffron, peacock....!!!

I didn't want to cover the embossing - so went with a simple "happy" and a sprinkling of flower sequins to keep it cheerful.  I LOVE these flower sequins but they are seriously cupped so I assume they wouldn't mail well.  Since I was handing this to her personally, it seemed the perfect time to bring them out.

03.19.21 Slimline Happy side

SUPPLY LIST

Dies: CZ Design (Simon Says) Chunky Happy Wafer Die, Mama Elephant Slim Card Basics (the scalloped edge), Taylored Expressions On Repeat die (the mini banner)

Paper: Stampin' Up Terracotta Tile, Petal Pink, So Saffron, Pretty Peacock, Pool Party

Other: Spellbinders Slimline Flora Embossing Folder, Honey Bee Pocket Full of Posies and Black Gem stickers, Altenew washi

Thursday, March 18, 2021

TGIF and The Paper Players: Dragonfly Birthday

With my current goal of using things out of my basket of stash-to-try, I pulled out some Stampin' Up Laser Cut paper.  (BTW - my stash of not-yet-used stamps and dies will never all be used. The stash I'm referencing includes sprays, adhesives, inks and a variety of tools and, for today, laser cut paper.)

I saw the sketch at TGIF Challenges and thought it would be just perfect for one of the backgrounds in the laser-cut set. But my two favorite backgrounds are the dragonflies and the dandelions and I just didn't want to cover them with the circles from the sketch.  But happily, the laser-cuts include a gorgeous circle and problem solved!!

03.18.21 Birthday Dragonflies

I'm a two-challenge player today!. I knew I had to put color behind those laser-cuts and the colors at The Paper Players seemed totally perfect for the little dragonflies! I don't use a lot of the subtle colors but I love that the color combo paired them with Old Olive.  

Thank you to both challenges for the inspiration!


SUPPLY LIST
Stamps: Stampin' Up Wishing You Well (retired)
Dies: Stampin' Up Stitched Shapes Framelits, Tasteful Labels
Paper: Stampin' Up Seaside Spray and Old Olive Cardstock, Subtles dsp
Other: Stampin' Up Dandy Laser-Cut Paper

Wednesday, March 17, 2021

The Card Concept: Brilliant Butterfly Birthday

There’s a new inspiration challenge at The Card Concept and the theme is Butterfly Brilliance.


I was inspired by the big, brilliantly-colored butterfly on the background of green. I definitely went big and I definitely went bright green!  This is a "Classy and Elegant" card as it is full of  rich colors, it's dramatic and it has many textures. 

03.17.21 Card Concept

I tend toward white-based cards - not black. I did try a white butterfly but the papers in his wings just didn't look as brilliant so I stuck with black. Because of my tendencies toward white, it seemed very dark so I used bright green in the background then I added a white sentiment.  The white for the sentiment didn't "connect" to the card so I pulled out twine and a splattering of white sequins.  (What I should have done is added white splatters to the green background and I actually started down that path after I had the card put together.  I even cut a butterfly out of scraps to mask it. And then I realized how likely it would be to ruin the card given I'm not even comfortable splattering on a plain background!)

I hope to see you playing along with us at The Card Concept!

SUPPLY LIST

Stamps: Waffle Flower Essential Sentiments (and matching dies)

Dies: L'il Inkers Cover Up Die Butterfly

Paper: Craft Consortium Ink Drops - Vivid 6x6 pad, Taylored Expressions Plum Punch and Lime Zest

Other: Taylored Expressions Leafy Vine Embossing Folder

Freshly Made Sketches: A Hedgehog Smile

It's time for a new sketch at Freshly Made Sketches! Today we have a sketch by Jen Mitchell and here’s what I did with it!
 
03.17.21 FMS side


I pulled out a not-yet-used die set. I love the dimension because of the two layers.  I cut and adhered the top layer three times to really make the hedgehog and his little flower garden stand out. 

03.17.21 FMS

The sketch didn't specify where to put the sentiment.  First I had to decide what he should be saying and I knew he had made me smile so that seemed appropriate. I looked though my stash for one that would fit in amongst the detail and this one by Gina K fit just right!

The paper is older. I planned on some really bright spring colors and even had it cut, but to my eye, it overwhelmed the little scene. I dug way back in my stash and found this paper with sweet floral colors and a big stripe but with a softer look. 

I hope to see you playing along with us at Freshly Made Sketches.

SUPPLY LIST

Dies: Penny Black Hedgehog Scene, Gina K Smile

Paper: Simple Stories I Am 6x6 paper pad

Other: Miscellaneous Pretty Pink Posh Gems, Stampin' Up Subtles Embossing Folder

Tuesday, March 16, 2021

Tic Tac Toe Challenge: He is Risen

 I'm a bit behind on Easter cards.  I hadn't look at the date and I just realized it's only a few weeks away.  When I saw the current challenge at Tic Tac Toe challenge and realized that "Easter" was in the grid, I knew I would be playing along. I had a new slimline sunshine die from scrapbook.com that I wanted to use on an Easter card so going down the grid for gold and yellow was just what I needed

03.16.21 Tic Tac Toe


I kept this very simple.  I did play with a variety of yellows and had some very bright combinations on my desk.  I settled on Pineapple from Taylored Expressions. It's a soft yellow without being pale.  I wanted to highlight the sun at the bottom so I cute a second one out of the gold foil and offset it slightly then popped them both.

03.16.21 Tic Tac Toe side

It's a simple card, but I like that the focus is all on the meaning.

Thanks to the Tic Tac Toe Challenge for the inspiration.

SUPPLY LIST
Dies: Scrapbook.com Slim Sunshine, Memory Box Happy Easter Posh Script
Paper: Taylored Expressions Pineapple, scrap of patterned yellow, Concord & 9th Neutrals Foils pack
Other: Studio Katia Gold Foil Pearls, Simon Says Stamp Reverse Easter

Sunday, March 14, 2021

A Snowy Card on a Snowy Weekend

Earlier this the week, our weather forecasters said there was a chance of five FEET of snow this weekend - an historic blizzard!  By mid-week, it was down to two to three feet but still a record-setter. So we all cleaned out the grocery stores (and liquor stores) and settled in with the books on our Kindles and with our binge-watching planned (assuming the power was on). I haven't seen The Queen's Gambit so that was my plan. Jim Cantore from the Weather Channel is even here - when he shows up the world might as well be ending. 

Yesterday morning it was "delayed" until evening but it was still coming.  Snow results this morning - I only have about 4 inches on my deck.  It is supposed to snow all day but only dropping another measly 4 - 6 inches.  Definitely not an epic storm - but an epic forecasting failure!  (In fairness, other areas got a bit more and the roads are truly bad.  It would have been a big snow if it weren't for the massive expectations.)  EDITED: It just kept coming and coming - and we ended up with two feet which apparently was a record-setter!!!

Yesterday, when it was still coming - I was in the mood for snowy Christmas cards.

03.14.21 Snowy Joy

This paper was wildly popular at Christmas.  I finally found it back in stock in February. I'm not a big user of patterned papers but I love this pad by Whimsy Stamps.  It's full of snowy backgrounds from cute and bright to papers like this with the soft look of misty lights. 

I took my cue from the glow in the background and added the big "joy" in copper. Then matched up some cardstock for the snowflakes. Such an easy card with the paper and the fabulous dies doing all of the work!!

SUPPLY LIST

Dies: Penny Black Mirthful (no idea why it is named "Mirthful" given it's just a "Joy" die but I've double-checked that I have it right!!), Simon Says Marie Snowflake, Abby Snowflake, Maryanne Snowflake and A2 Thin Frames

Paper: Whimsy Stamps Blurry Flurries, Stampin' Up cardstock in Misty Moonlight and Seaside Spray, glittery white from Michaels (there's not a name on it but it's the one that says it works in printers), Tonic Studios Copper Mine Mirror

Other: Little Things Bronze Mix Jewels

Saturday, March 13, 2021

The Color Throwdown: Heartfelt Sympathy

 The challenge at The Color Throwdown came at an opportune time - my husband had just asked me to make a sympathy card. It was a bit easier to make than the usual sympathy card because I did not know the person and my husband hadn't seen him decades.  But he was very important to my husband in his youth so he wanted to make sure the family knew that he remembered and he cared.

I already knew I was going to use this soft flower and then I was drawn to The Color Throwdown colors of light blue, gray and kraft for the very odd reason that it's a real struggle for me to do leaves that aren't green!  This color scheme forced me into a gray or a kraft. (I guess I could have done gray flowers and blue leaves but that's really pushing it for me!!)

03.13.21 Color Throwdown

This is another flower set that uses stencils to add the color.  With my new-found passions for stencils it definitely found a home in my stash!!  This is my most-used sympathy sentiment - it has such fabulous fonts and style - but it's from the now-closed Verve.  I found the background paper in my older stash. It's a Stampin' Up dsp that's all kraft/brown with subtle shiny patterns.  I think it was for a technique but I just wanted the elegant pattern.

03.13.21 Color Throwdown side

Thank you to The Color Throwdown for the inspiration!

SUPPLY LIST

Stamps: Pinkfresh Studio Choose Hope, Verve New Mercies (the company is no longer)

Dies: Pinkfresh Studio Choose Hope die and Ornate Banner

Cardstock: Stampin' Up

Ink: Blues from the Altenew Lapis Lazuli set, Grays are Simon Says Fog and Stone

Other: Studio Katia Bluebell Pearls

Friday, March 12, 2021

Bright Blossoms

 Over the last weekend, I was browsing the Altenew store - not for new stamp and dies, but I was looking at cards made with the various colors of their inks.  I was trying to decide how many other colors of their inks that I needed (I have a few basic sets).  A fell head over heals for one of the sample cards from a set called Bright Blossoms.  Here it is on the designer's blog - go to the second picture, the colorful flowers.  I can't even tell you what tickled me so much - I love the colors, the flowers are cute, but I especially love the way she arranged the whole card.

But sometimes I can actually exercise self-control.  I was browsing for inks, not for stamps and dies. Not to mention, it was really her use of the flowers that I loved so if I bought the set, I knew I might just CASE hers and then never use the set again.

Fast forward a day. I got an email from scrapbook.com that they had a new Spellbinder shipment. I've been holding my breath waiting for whichever store got the new slimline embossing folder from Spellbinders in stock first.  So I was in that store right away and had it in my cart.  If you've never shopped at scrapbook.com and you go there now, just know that you never leave without looking at the clearance section.  Their clearance isn't 5% or even 10% - it's a true clearance.  And guess what was there? The Bright Blossom set.  Not only was it there but it was 60% off - and the matching dies were only $2.69. That was meant to be!!

I got in the mail this afternoon and I rushed to put a card together because at the point I am writing this, they are still available at scrapbook.com. And I love enabling all of you with great deals!

03.12.21 Bright Blossoms

I got the flowers stamped and then wasn't sure what to do with them.  I have this Simon Says "just because" in my unused stash and I thought that the bold look of it would be a fun match to the unique flowers.

03.12.21 Bright Blossoms side

And now I'm going to quit typing because I have that slimline embossing folder to play with!

SUPPLY LIST
Stamps: Altenew Bright Blossoms
Dies: Altenew Bright Blossoms dies, Simon Says Stamp (CZ Design) Just Because, Spellbinders Hemstitch Rectangles
Ink: Altenew Chamomile, Snapdragon, Ruby Red, Parrot and Fresh Leaf

Thursday, March 11, 2021

Poppystamps: Speckled Eggs for Easter

 I'm on the Poppystamps blog today with this fresh and simple Easter card

031121 PS

The Spring Bunnies, Farm Fresh Eggs and Splendid Happy Easter are all brand new from Poppystamps.  The plaid the the cardstock are all new from Memory Box. This card doesn't show the full fabulousness of the cardstock - it comes in big pads of ombre colors so you can match and layer perfectly!

0311.21 PS close>

I splattered the eggs with some white and gold.  I layered the bunny with a piece of neutral cardstock to give him a shadow and make him pop from the background.

This would be an easy card to mass produce for Easter.  And you could keep it interesting for you by changing up the plaids (there are many in this paper pad and there's a second new plaid pad) and the egg colors.  There's also a second bunny in the die set so you could change that too.

More details are on the Poppystamps blog!

SUPPLY LIST

Dies: Poppystamps Spring Bunnies, Farm Fresh Eggs, Little Bits of Turf and Splendid Happy Easter, Memory Box Double Stitch Rectangle Cut Out

Paper: Memory Box Madras Plaid Coral and Green, Polished Foil, and cardstock in Fresh Aqua, Lush Green, Berry Red and Earth Neutral

Wednesday, March 10, 2021

Freshly Made Sketches: The Resurrection

It's time for a new sketch at Freshly Made Sketches! Today we have a sketch by Linda and here’s what I did with it!
 
03.10.21 FMS

I was definitely planning on three bright stripes - like a rainbow - but as I was flipping through my dies, I saw the Pinkfresh Curvy Leaves die and realized the biggest die would fit perfectly. From there, this card came together very quickly. For the "any shape" component, a butterfly on the leaves seemed just right.  And butterflies are a beautiful symbol of resurrection so I have an Easter card!

03.10.21 FMS side

The rays of sunshine were done with the Pinkfresh Layered Sunburst stencil set.  I am a very late adopter of stencils but now that I've started, I can't stop.  Last week, I did a post on repositionable stencil adhesives and couldn't believe I waited so long to use them!!  LOVE it - so now when I'm layering three stencils like in this sunburst - it's easy-peasy!!

I hope to see you playing along with us this week at Freshly Made Sketches!

SUPPLY LIST

Stamps: Taylored Expressions He Is Risen

Dies: Pinkfresh Curvy Leaves, Memory Box Kaleidoscope Butterfly (top layer) and Moonlight Butterfly (bottom layer)

Paper: Memory Box Graceful Garden Glitter pad

Other: Pinkfresh Layered Sunburst Stencil set

Friday, March 5, 2021

Experimenting with Stencil Adhesives

03.05.21 Stencil

I've been talking about my giant basket of supplies all of which I needed to make decisions about.  They are things other cardmakers had recommended and I immediately purchased - but do I really need them (or multiple choices of a product) since I still haven't used them.

Today, I played with repositionable stencil adhesives.  The classic is Pixie Spray but someone had recommended Krylon Easy-Tack which does have the advantage of being in the local craft stores.  

03.05.21 Stencil Spray

I used them both to add color to the four flowers.  Honestly...six of one - half dozen of the other.  The Krylon is perhaps slightly stickier - just a bit harder to peel up. I was initially worried it would peel up paper or other ink - but the stickiness didn't cause any problems. That's not to say that the less-sticky Pixie Spray was a problem.  In fact, I did three of those flowers - each requiring repositioning the stencil 13 times to get the various leaves and flowers- and the Pixie Spray stayed sticky the whole time. 

So no choice between the two but what I did learn - repositionable adhesive is totally worth it.  I can't believe I waited this long to use it. I haven't been using stencils often so I just stuck them down with a piece of repositionable tape along an edge or two but that meant the center part wouldn't be firmly down.  I think I would have been using stencils a LOT more if I had gone with the spray adhesive to start with.  Every single edge is so nicely adhered, it makes brushing on color just a dream.

I LOVE the clean results using the stencil fully adhered.

03.05.21 Stencil side

I trimmed the card down about 5/8".  It's a really tall flower so I angled it slightly and then wanted it over the edge yet sill a standard size. I initially didn't get this flower because of its unique size and shape - then I saw one of my favorite ever cardmakers do some creative things with it - check out Laurie Willison's fabulous samples!

BTW - I was also experimenting with some Altenew mini-cubes that I recently purchased.  A few weeks ago, I did a card with their Rainbow Prism set  (out of that same basket of untried products!) which I liked but lamented that I hadn't picked the right starter set and what I really needed were the some of the packs with colors in the same family to allow for easy layering. Now I have some of those and that's what I'm playing with today.  Here are two of my color combinations (details in the supply list).  I have a "celebrate" die coming from Altenew and when I get it I'll doing something with the brighter flower.

03.05.21 Stencil 2

SUPPLY LIST

Stamps: Altenew Our Friendship Blooms stamp, die and stencil combo

Die: Altenew Fancy Hello

Ink: Altenew Canyon Clay (brushed then the detail stamped), Chamomile (brushed) with Snapdragon stamped detail and a little brushed on the bud, Eastern Sky (brushed then the detail stamped), Grass Field (brushed) with Shadow Creek detail stamped, Iceberg lightly brushed in the background

Other: Altenew washi, Yellow Stickles on the flower centers

FYI - The darker flowers the Altenew Rainbow Prism set long with what I hoped would be coordinating darker colors from other sets.  I used Ruby Red with Burnt Red accents, Warm Sunshine with Snapdragon accents, Orange Cream with Marigold accents, Parrot with Grass Field Accents

Thursday, March 4, 2021

Old SU In-Colors and Vases in Terracotta

I have been trying to decide whether to add to my cardstock stash and add refills for the Stampin' Up 2019-2021 In Colors before they retire. I haven't used them much and I'm not sure why.  So I pulled them out to play before making a decision.

03.05.21 Varied Vases

I got Varied Vases when it was retiring.  I don't why I do that. I'm scared I'll regret not having a product - but then there's wonderful new stuff and I never use the old stuff.  So with that very long story - that's how my card came about!!  I used Terracotta for the pots and Rococo Rose and Seaside Spray for the flowers - then I couldn't decide on the center flowers so I decided to make them leaves!  I used Pretty Peacock as a table.

This started out as my card for Freshly Made Sketches but I decided the three rectangles on the sketch just weren't obvious enough - and I had a different idea which I posted yesterday. But a shout out to the sketch for the inspiration.

Sadly, still no decision on whether I'm getting more cardstock or ink refills. 

SUPPLY LIST

Stamps: Stampin' Up Varied Vases

Dies: Stampin' Up Rectangle Stitched Framelits, Vase Builder Punch

Ink: Stampin' Up Terracotta Tile, Rococo Rose, Pear Pizzazz, Seaside Spray, Pretty Peacok

Other: Stampin' Up Painted Texture Embossing Folder, 2019-2021 In Color Faceted Dots, Natural Chevron Ribbon (very old)

Wednesday, March 3, 2021

The Card Concept: Just a Note

It's time for a new challenge at The Card Concept. It is "Luck of the Irish" with a leprechaun hat and a bouquet of dainty flowers.

03.03.21 Card Concept

I have never done much for St. Patrick's Day - there's not a hint of Irish in me! Although we do feast on corned beef and cabbage - LOVE it!  Instead of anything Irish, the inspiration photo inspired me with the colors (a brighter green than I'd normally use!), the dainty flowers and the bold black hat stripe which led me toward a bold black sentiment.  I created a Clean and Layered card with Forget-Me-Nots.

03.03.21 Card Concept close

Inspiration can happen in many ways! I hope to see you playing along with use this week at The Card Concept.

SUPPLY LIST

Stamps: The Greetery Opposites Attract

Dies: The Greetery BotaniCuts Forget-Me-Nots and Opposites Attract

Paper: Doodlebug Design 12x12 Buffalo Check - Wood Grain Rainbow Petite Prints, cardstock in Lemon Tart and Harvest Gold; Taylored Expressions Pineapple and Cilantro

Other: Pretty Pink Posh Buttercream Gems

Freshly Made Sketches: Hey from a Whittle Monkey

It's time for a new sketch at Freshly Made Sketches! Today we have a sketch by Jacquie and here’s what I did with it!
 
03.03.21 FMS


I love sketch challenges because of the wide open interpretation.  I actually started this card with little terracotta vases, but am not posting it here because I decided it was a bit too hard to see the sketch in it (I think I'll post it tomorrow).  I decided to stick with rectangles. Then I saw a recent purchase on my desk - the wooden letters.  I started thinking of three letters I could use - and when I came up with "HEY" that's when the monkeys in the jungle popped into my head! Now I have another card in my stash for my college kids.  It might be a bit "cute" for 21 and 25 year old sons - but it seems very appropriate!

03.03.21 FMS side 2

I hope to see you playing along with us this week at Freshly Made Sketches!

SUPPLY LIST

Dies: Memory Box Wrapped Stitch Rectangles, Verdant Leaf, and Wooden Alpha, Poppystamps Whittle Monkey

Paper: Memory Box Garden Folly 6x6 pad