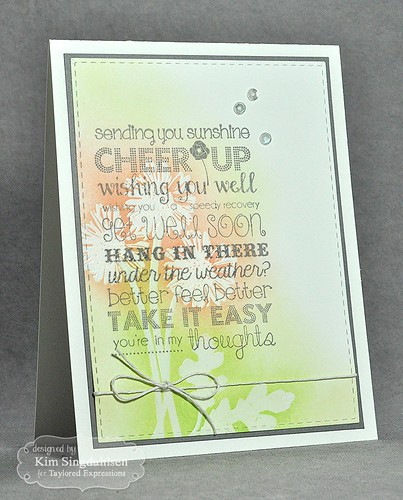
I have a fun "get well" sentiment from Taylored Expressions that I knew would be just perfect for a friend but I just wasn't sure what to do with it. It's a big sentiment but I wanted to keep it soft and sweet. I decided to add some embossed daisies in the background and then lightly sponge some soft colors.
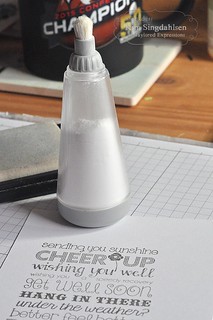
It's been awhile since I've done this so I took a few pictures along the way. First, I stamped the sentiment. Then I dusted it with powder. I didn't want any of the embossing powder in the next step to stick to the letters. (It's not a huge problem if you don't use powder since the embossing powder is clear - but you do get little bits of shine in random places - trust me!)
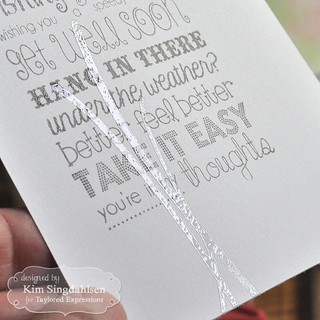
The flowers come from a multi-step daisy set. I stamped and clear embossed the stems first. This helped me see the stems while I was lining up the daisies. Although I don't show it in this picture, I used the middle daisy of the layering set (the smaller daisy). The bottom daisy is the base so doesn't have any detail, and the top daisy is just a few shadows - so the middle daisy gave just the right amount of detail for this technique.
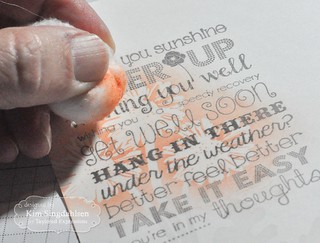
I know there are a variety of tools out there, but I like cotton balls for sponging because it's easy to fade the color and I don't get the accidental hard lines that I sometimes get from the edges of daubers or cosmetic sponges. I can also vary the size of the cotton ball. In this case, I pinched it to make it a little smaller. I started in the center of each flower moving in a circular motion.
I had a few false starts with the colors. The first colors I tried were too light and you couldn't make out the flowers. The second colors were too dark so the sentiment got lost. Of course, I went to the work of stamping the sentiment and embossing the flowers - then made the mistake with the colors - twice - you'd think I would have learned to test sponge on a scrap piece first!! But I do like the final results. I ended up using Simon Says Stamp Apricot, Lemon Chiffon and Green Apple.
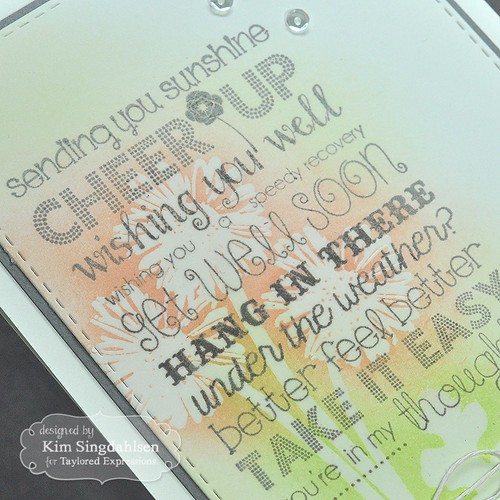
One other thing that I learned with my many mistakes on this card. I actually cut the panel slightly bigger, then sponged, then used the stitched rectangle die. I found that if I had the stitching there first, and then sponged, it got much darker along the stitched edge, and I preferred that it faded out.
I don't know why I don't do this more often. I really like the variety of colors merging into each other. And for me it's easier than watercoloring!!
SUPPLY LIST


This is so soft and pretty Kim! LOVE it! Thanks for the tip for using cotton balls . . . I can't get the hang of the blending tools . . I will give this a try! Have a lovely weekend! Hazel xx
ReplyDeleteMy Card Attic
Interesting that you use cotton balls Kim. I would have thought they would leave fluff stuck to everything. I am going to give it a try! I adore the soft blending you have achieved on this card and enjoyed reading your creative process, flaws and all, lol.
ReplyDeleteSuch a pretty card and your blending is so soft and perfect. But I am glad to know I am not the only person who makes mistakes after the hard parts are done, not laughing glad but well you know. I might have to try the cotton balls too as I always seem to get too heavy with my blending tool and I am enjoying the super soft blending I am seeing. I really like that clear embossing over the sentiment too, its worked perfectly.
ReplyDeleteSo soft and pretty Kim and love the step by step photos!
ReplyDeleteThis is beautiful Kim, wonderful design!!
ReplyDeleteI love this card, Kims! Thank you for the great phototorial!! Hugs, Darnell
ReplyDeleteYou've used that large stamp perfectly. I really like the embossed flowers underneath the sentiment; they really bring you right in. And your sponging is lovely. I will have to try cotton balls next time; you're so right about those darn lines. (I never learn either...I've got 3 watercolored panels sitting on my desk...ready for the recycle bin!) Gorgeous card! Bev
ReplyDeleteWOW!! I LOVE how you did this!! This technique seems like a no brainer but I have NEVER thought to try this. Now I will. Thank you for your tutorial!!
ReplyDeleteWow! Way too harsh criticism on yourself. This card turned out so perfect just the way it is. It looks so professional! I love the techniques do this is the best example I've ever seen of it.
ReplyDeleteKim, a stunning card that truly has taken my breath away! You've showcased the large sentiment to perfection with your lightly sponged, embossed background. Gorgeous! Thank you for the tip about cotton balls; I fall prey to the 'lines' all. the. time!
ReplyDelete~carol