There are so many holidays and occasions on which we have to send cards, I also like sending cards out of the blue. I'm not saying holiday and birthday cards don't have meaning; it's wonderful to send and receive those cards. But it can be a real day brightener to find an unexpected card in the mailbox. Over the years I've also come to realize that when a little voice in my head says "send a card", I shouldn't ignore it because there have been just enough times when a recipient has commented that my card came just when they needed it most.
For today's card, I just felt a need to check in on a long-time acquaintance that I haven't heard from or about in way too long. I need to call or schedule coffee too - it's on me for letting it go this long - but I was thinking of her early this morning and decided to first send a card.
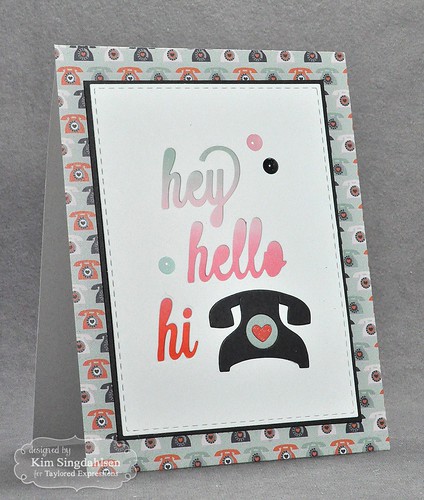
I pulled out a die set that includes hey, hello and hi word dies and also this old-fashioned phone. (My friend and I are both old enough to remember rotary phones!)

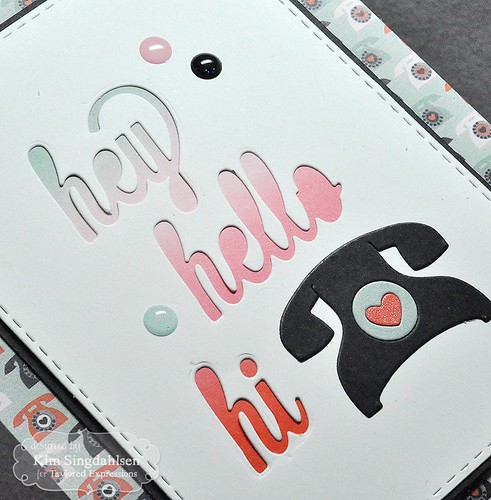
I had the time this morning to step it up just a bit, so I added dimension by using the negative die-cut technique on the words, then added the phone on top - you can see it better on this picture. I cut a smaller piece of white cardstock and sponged it with a rainbow of colors to coordinate with the paper and adhered it behind the die-cut words.

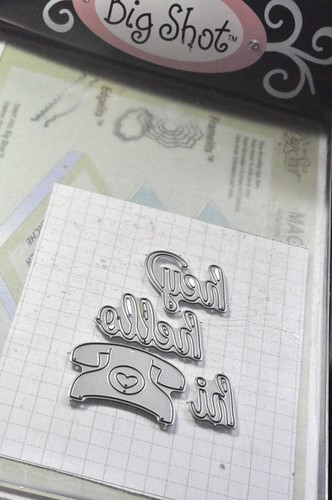
Lining up the dies can be a real pain when you are doing a variety of die cuts directly into your main piece of cardstock. Here's a picture of how I do it (there are likely better ways, but I've gotten comfortable with this - it works for me!) I cut a piece of grid paper or graph paper - anything with lines to help line things up - to the same size as the cardstock that I'm cutting. I put it under the bottom plate on my Big Shot, then the cutting plate, then I line up the dies facing up. (Normally I used my Big Shot with the cardstock first and dies facing down onto the cardstock, so this is a unique step for me). Then I can just place the paper on top using the grid/graph paper to get it straight and I get a perfect cut! BTW - I added the phone die so I could get the alignment right, then I took the phone die away before I actually cut the paper.

Time to get the envelope addressed and find a stamp!
SUPPLY LIST
The paper is Pink Paislee Switchboard.
To sponge the colors, I used Distress Inks in Cracked Pistachio, Spun Sugar, Worn Lipstick and Ripe Persimmon.


I love this sweet card, Kim! It has so many lovely details - the perfect patterned paper, the soft ink background, the touch of glitter on the phone. So great! Also thanks for the tip about lining up the dies - so clever! I will definitely try that. And I'm with you, 'just because' cards are often the best. :)
ReplyDeleteGorgeous!!!
ReplyDeleteWell this is just adorable and I love that you showed your process! I march to the beat of my own drum on most of those things too. Your friend is going to be tickled pink when she goes to her mailbox!!
ReplyDeleteI am in love with how you used the negative to create the sentiment. It looks so cool!! I remember rotary phones too and wish I still had the ones that we owned!!! Wonderful design on this card!!
ReplyDeleteLove those die cuts! This is adorable....and I love the funky retro look!
ReplyDeleteA meaningful card and your longtime friend will definitely love it!
ReplyDeleteLove the layering and diecutting you did. I haven't tried grid paper yet, but it looks like worth trying, thanks for sharing!
I love to make cards, but life just gets in the way too often.
You're soo right to listen to that voice inside and actually send the card.
Bye and have a nice day,
Marjolein
What a cute card! Brings back memories of the olden days when we had rotary dials and phones tied to the wall...usually in the kitchen where Mom could hear every word we said. We survived, though...
ReplyDeleteThose dies are so much fun Kim, so glad that listen to that little voice. Your friend will love the card because it is so dog gone cute!
ReplyDeleteHmmm... old enough to remember those too!
ReplyDeleteGreat card... love the colors!